如何布局UIViewController的UIView
考虑问题
- 首先考虑尺寸变化自适应,如不同尺寸设备、屏幕旋转等
- 包含是否有UINavigationBar或UITabBar场景
- 尽量避免硬编码间距:如20、44、49 等
文档
automaticallyAdjustsScrollViewInset IOS11过时
- true
简单的说:根据按所在界面的status bar、navigationbar、tabbar的高度,自动调整scrollview的inset - false
简单的说:不让viewController调整,自定义布局
苹果官方所言:
Discussion
The default value of this property is true, which lets container view controllers know that they should adjust the scroll view insets of this view controller’s view to account for screen areas consumed by a status bar, search bar, navigation bar, toolbar, or tab bar. Set this property to false if your view controller implementation manages its own scroll view inset adjustments.
滚动视图UIScrollView以及子类
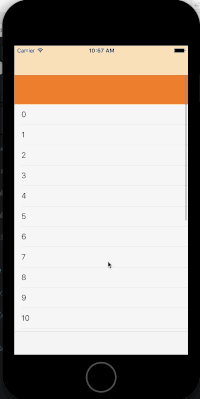
案例: -> false
非滚动视图
对非滚动视图不起作用,系统不起作用
contentInsetAdjustmentBehavior IOS11及以后
- UIScrollViewContentInsetAdjustmentAutomatic
scrollView会自动计算和适应顶部和底部的内边距并且在scrollView不可滚动时,也会设置内边距 - UIScrollViewContentInsetAdjustmentScrollableAxes
scrollView会自动计算和适应顶部和底部的内边距并且在scrollView不可滚动时,也会设置内边距 - UIScrollViewContentInsetAdjustmentNever
不计算内边距 - UIScrollViewContentInsetAdjustmentAlways
根据safeAreaInsets计算内边距
苹果官方所言:
Discussion
This property specifies how the safe area insets are used to modify the content area of the scroll view. The default value of this property is UIScrollViewContentInsetAdjustmentAutomatic.
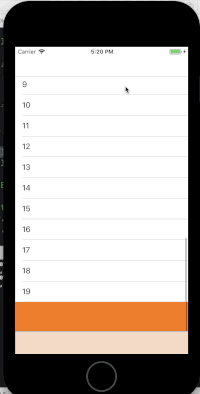
案例: -> UIScrollViewContentInsetAdjustmentNever
edgesForExtendedLayout
默认值是UIRectEdgeAll,意味着view会被拓展到整个屏幕
苹果官方所言:
Discussion
Instead of this property, use the safe area of your view to determine which parts of your interface are occluded by other content. For more information, see the safeAreaLayoutGuide and safeAreaInsets properties of UIView.
In iOS 10 and earlier, use this property to report which edges of your view controller extend underneath navigation bars or other system-provided views. The default value of this property is all, and it is recommended that you do not change that value.
If you remove an edge value from this property, the system does not lay out your content underneath other bars on that same edge. In addition, the system provides a default background so that translucent bars have an appropriate appearance. The window’s root view controller does not react to this property.
案例:
self. edgesForExtendedLayout = UIRectEdgeNone
self.navigationController.navigationBar.translucent = NO
extendedLayoutIncludesOpaqueBars
意味着延伸视图包不包含不透明的UINavigationBar,指定导航栏是透明还是不透明。默认为YES
苹果官方所言:
Discussion
The default value of this property is false.
Note
Bars are translucent by default in iOS 7.0
案例:
Demo1 -> 导航条背景图片1
2UINavigationBar *bar = [UINavigationBar appearance]
[bar setBackgroundImage:[UIImage imageNamed:@"地址"] forBarMetrics:UIBarMetricsDefault]
Demo2 -> 导航条背景颜色1
2UINavigationBar *bar = [UINavigationBar appearance]
[bar setBackgroundImage:[UIImage imageNamed:@"地址"] forBarMetrics:UIBarMetricsDefault]
Demo3 -> 导航条不透明,尺寸从导航条底部开始1
[bar setBarTintColor:[UIColor whiteColor]]
modalPresentationCapturesStatusBarAppearance
指定呈现非全屏的视图控制器是否接管来自呈现视图控制器的状态栏外观的控制
苹果官方所言:
Discussion
The default value of this property is false.
When you present a view controller by calling the present(_:animated:completion:) method, status bar appearance control is transferred from the presenting to the presented view controller only if the presented controller’s modalPresentationStyle value is fullScreen. By setting this property to true, you specify the presented view controller controls status bar appearance, even though presented non-fullscreen.
The system ignores this property’s value for a view controller presented fullscreen.
案例:
1 | UIViewController *controller = [UIViewController new]; |
autoresizingMask
指定一个整数位掩码,用于确定接收方在其超视图边界更改时自动调整自身的大小
苹果官方所言:
Discussion
When a view’s bounds change, that view automatically resizes its subviews according to each subview’s autoresizing mask. You specify the value of this mask by combining the constants described in UIViewAutoresizing using the C bitwise OR operator. Combining these constants lets you specify which dimensions of the view should grow or shrink relative to the superview. The default value of this property is UIViewAutoresizingNone, which indicates that the view should not be resized at all.
When more than one option along the same axis is set, the default behavior is to distribute the size difference proportionally among the flexible portions. The larger the flexible portion, relative to the other flexible portions, the more it is likely to grow. For example, suppose this property includes the UIViewAutoresizingFlexibleWidth and UIViewAutoresizingFlexibleRightMargin constants but does not include the UIViewAutoresizingFlexibleLeftMargin constant, thus indicating that the width of the view’s left margin is fixed but that the view’s width and right margin may change. Thus, the view appears anchored to the left side of its superview while both the view width and the gap to the right of the view increase.
If the autoresizing behaviors do not offer the precise layout that you need for your views, you can use a custom container view and override its layoutSubviews method to position your subviews more precisely.
1 | typedef NS_OPTIONS(NSUInteger, UIViewAutoresizing) { |
其中**<<**代表了复位,也就是可以多选。可以复习一下**位运算**
- UIViewAutoresizingNone view的frame不会随superview的改变而改变
- UIViewAutoresizingFlexibleLeftMargin 自动调整view与superview左边的距离保证右边距离不变
- UIViewAutoresizingFlexibleWidth 自动调整view的宽度,保证view与superview的左右边距变
- UIViewAutoresizingFlexibleRightMargin 自动调整view与superview右边的距离保证左边距离不变
- UIViewAutoresizingFlexibleTopMargin 自动调整view与superview顶部的距离保证底部距离不变
- UIViewAutoresizingFlexibleHeight 自动调整view的高度,保证view与superview的上下边距不变
- UIViewAutoresizingFlexibleBottomMargin 自动调整view与superview底部的距离保证顶部不变
| UIViewAutoresizing | 说明 | 效果 |
|---|---|---|
| none | view的frame不会随superview的改变而改变 | 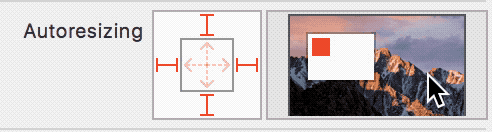 |
| top、left | view与其superView的左边距和上边距按比例调整 | 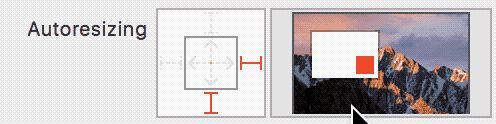 |
| bottom 、right | view与其superView的右边距和下边距按比例调整 | 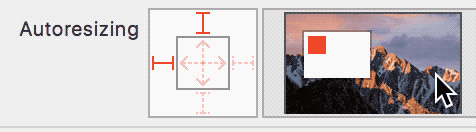 |
| width 、height | view与其superView的宽度和高度按比例调整 | 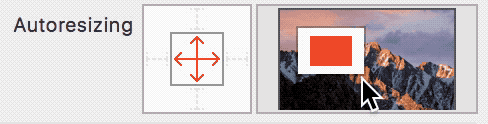 |
| bottom、right、width 、height | view与其superView的底部和右边距和宽度和高度按比例调整 | 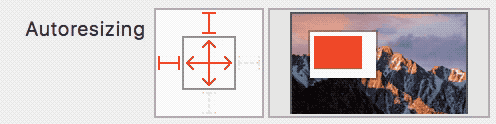 |
autolayout
了解自动布局
自动布局根据放置在这些视图上的约束,动态计算视图层次结构中所有视图的大小和位置。例如,您可以约束一个按钮,使其与图像视图水平居中,并使按钮的上边缘始终保持低于图像底部8个点。如果图像视图的大小或位置发生变化,按钮的位置会自动调整为匹配。
这种基于约束的设计方法允许您构建动态响应内部和外部变化的用户界面。
外部变化
如果您的超级视图的大小或形状发生变化,则会发生外部更改。每次更改时,都必须更新视图层次结构的布局,以最大限度地利用可用空间。以下是外部变化的一些常见来源:
用户调整窗口(OS X)的大小。
用户在iPad(iOS)上输入或离开分割视图。
设备旋转(iOS)。
当前通话和录音条出现或消失(iOS)。
你想支持不同大小的类。
你想支持不同的屏幕尺寸。
这些更改大部分可以在运行时发生,并且需要来自应用程序的动态响应。其他,如支持不同的屏幕尺寸,代表适应不同的环境的应用程序。即使通过屏幕大小通常不会在运行时改变,创建一个适应性接口,让您的应用程序在iPhone 4S,iPhone 6 Plus,甚至iPad上运行同样好。自动布局也是支持iPad上的幻灯片和拆分视图的关键组件。
内部变化
当用户界面中的视图或控件的大小发生更改时,会发生内部更改。
以下是内部变化的一些常见来源:
应用程序显示的内容发生变化。
该应用程序支持国际化。
该应用程序支持动态类型(iOS)。
当您的应用程序的内容发生变化时,新内容可能需要与旧版本不同的布局。这通常发生在显示文本或图像的应用程序中。例如,新闻应用程序需要根据各个新闻报道的大小来调整其布局。同样,照片拼贴必须处理各种图像尺寸和宽高比。
国际化是让您的应用能够适应不同的语言,地区和文化的过程。国际化的应用程序的布局必须考虑到这些差异,并正确显示在应用程序支持的所有语言和地区。
国际化对布局有三个主要影响。首先,将用户界面翻译成其他语言时,标签需要不同的空间。例如,德语通常比英语需要更多的空间。日本人经常要求少得多。
其次,用于表示日期和数字的格式可能会因地区而异,即使语言不变。虽然这些变化通常比语言变化更微妙,但用户界面仍然需要适应大小的轻微变化。
第三,改变语言不仅会影响文本的大小,还会影响到布局的组织。不同的语言使用不同的布局方向 例如,英语使用从左到右的布局方向,阿拉伯语和希伯来语使用从右到左的布局方向。通常,用户界面元素的顺序应与布局方向相匹配。如果按钮位于英文视图的右下角,则应位于阿拉伯语的左下角。
最后,如果你的iOS应用程序支持动态类型,用户可以改变你的应用程序中使用的字体大小。这可以改变用户界面中任何文本元素的高度和宽度。如果用户在应用程序运行时更改字体大小,则字体和布局都必须适应。
约束优先
默认情况下,所有约束都是必需的。自动布局必须计算满足所有约束的解决方案。如果不能,则出现错误。自动布局向控制台输出有关不可满足约束的信息,并选择其中一个约束来中断。然后重新计算解决方案没有破坏的约束。有关更多信息,请参阅Unsatisfiable Layouts。
您也可以创建可选约束。所有约束条件的优先级都在1到1000之间。优先级为1000的约束条件是必需的。所有其他限制是可选的。
计算解决方案时,自动布局尝试按优先级顺序从最高到最低来满足所有约束条件。如果它不能满足可选约束,则跳过该约束并继续到下一个约束。
即使可选的约束条件不能满足,它仍然可以影响布局。如果在跳过约束之后布局中存在歧义,系统会选择最接近约束的解决方案。通过这种方式,不满意的可选限制就成为一种拉动他们观点的力量。
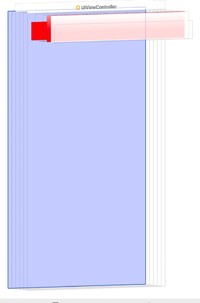
可选的制约因素和不平等往往是相辅相成的。例如,在清单3-4中,可以为这两个不等式提供不同的优先级。可能需要大于或等于关系(优先级为1000),小于或等于关系的优先级较低(优先级为250)。这意味着蓝色视图离红色不能超过8.0点。然而,其他的限制可能会把它拉远。尽管如此,可选的约束将蓝色视图拉向红色视图,以确保它在尽可能接近8.0点的间隔的情况下给定布局中的其他约束条件。
注意
不要觉得有义务使用全部1000个优先级值。事实上,优先级应该围绕系统定义的低(250),中(500),高(750)和必需(1000)优先级进行。您可能需要制定高于或低于这些值一个或两个点的约束,以帮助防止关系。如果超出这个范围,你可能想要重新检查布局的逻辑。
有关iOS上预定义约束常量的列表,请参阅UILayoutPriority枚举。对于OS X,请参阅布局优先级常量。
内在的内容大小
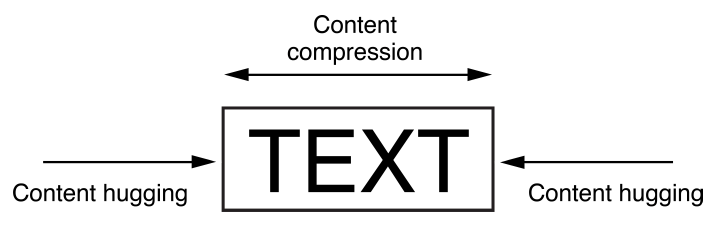
UILabel这些约束是使用清单3-5中显示的不等式定义的。这里,IntrinsicHeight和IntrinsicWidth常量表示从视图的固有内容尺寸的高度和宽度值。
清单3-5压缩阻力和内容拥抱方程
- // Compression Resistance
- View.height >= 0.0 * NotAnAttribute + IntrinsicHeight
- View.width >= 0.0 * NotAnAttribute + IntrinsicWidth
- // Content Hugging
- View.height <= 0.0 * NotAnAttribute + IntrinsicHeight
- View.width <= 0.0 * NotAnAttribute + IntrinsicWidth
只要有可能,在布局中使用视图的内在内容大小。它可以让您的布局动态适应视图内容的变化。它还减少了创建非歧义,非冲突布局所需的约束数量,但是您需要管理视图的内容拥抱和压缩阻力(CHCR)优先级。以下是处理固有内容大小的一些准则:
当扩展一系列视图以填充空间时,如果所有视图具有相同的内容拥抱优先级,则布局是不明确的。自动布局不知道应该拉伸哪个视图。
一个常见的例子是标签和文本字段对。通常情况下,您希望文本字段扩展以填充额外的空间,而标签保持其内在的内容大小。为确保这一点,请确保文本字段的水平内容拥抱优先级低于标签。
实际上,这个例子非常常见,Interface Builder会自动为你处理它,把所有标签的内容拥抱优先级设置为251.如果你是以编程方式创建布局,你需要自己修改内容拥抱优先级。
当不可见的背景(如按钮或标签)意外伸展超出其内在内容大小时,通常会出现奇怪的和意外的布局。实际的问题可能并不明显,因为文本只是出现在错误的位置。为了防止不必要的拉伸,增加内容拥抱优先级。
基线约束只适用于内在高度的视图。如果视图被垂直拉伸或压缩,则基线约束不再正确对齐。
一些视图,如开关,应始终显示其内在的内容大小。根据需要增加他们的CHCR优先级以防止伸展或压缩。
避免给予意见CHCR的优先事项。一般认为,大小错误比意外地产生冲突更好。如果一个视图应该始终是其内在的内容大小,那么可以考虑使用非常高的优先级(999)。这种方法通常可以保持视图不被拉伸或压缩,但仍然提供了一个紧急压力阀,以防万一您的视图显示在大于或小于预期的环境中。
技巧
你会发现Auto Layout经常提供多种方法来解决同样的问题。理想情况下,您应该选择最清楚地描述您的意图的解决方案。但是,不同的开发人员无疑会不同意哪种解决方案是最好的。在这里,保持一致胜于正确。如果您选择一种方法并始终坚持,您将会遇到较少的问题。例如,本指南使用以下经验法则:
整数乘法器比分数乘法器更受欢迎。
正常数比负常数更受欢迎。
视图应尽可能以布局顺序显示:导致尾随,从上到下。
childViewController
一个UIViewController应该且只应该管理一个UIView hierarchy,而通常来说一个完整的UIView hierarchy指的是整整占满一个屏幕。而且很多App满屏中会有各个区域管理不同的功能:
错误用法
1 | Demo4ViewController *controller = [[Demo4ViewController alloc] init]; |
正确用法
方案1
作为自定义的UIView的controller应当继承NSObject的类,而不是应该是UIViewController。一个UIViewController可以包含若干个这样自定义controller来控制一个UIView钟的不同部分功能实现。
1
2
3
4
5
6
7
8
9
10
11
12
13
14
15
16
17
18
19
20
21
22
23
24
25
26
27
28
29
30
31
32
33@interface BannerViewController : NSObject
@property (nonatomic, strong) UIView *view;
@end
@implementation BannerViewController
@end
@interface CouponViewController : NSObject
@property (nonatomic, strong) UIView *view;
@end
@implementation CouponViewController
@end
@interface DemoViewController : UIViewController
@property (nonatomic, strong) BannerViewController *bannerController;
@property (nonatomic, strong) CouponViewController *couponController;
@end
@implementation DemoViewController
@end
方案2
addChildViewController要实现一个容器视图控制器,你必须建立你的视图控制器和它的子视图控制器之间的关系。在尝试管理任何子视图控制器的视图之前,建立这些父子关系是必需的。这样做让UIKit知道你的视图控制器正在管理孩子的大小和位置。您可以在Interface Builder中创建这些关系,或以编程方式创建它们。以编程方式创建父子关系时,您明确地添加和删除子视图控制器作为视图控制器设置的一部分。
将子视图控制器添加到您的内容
要以编程方式将子视图控制器合并到内容中,请执行以下操作,在相关的视图控制器之间创建父子关系:
- 调用
addChildViewController:你的容器视图控制器的方法。
这个方法告诉UIKit你的容器视图控制器现在正在管理子视图控制器的视图。 - 将孩子的根视图添加到容器的视图层次结构中。
一定要记住设置孩子框架的大小和位置,作为这个过程的一部分。 - 添加任何约束来管理子视图的大小和位置。
- 调用
didMoveToParentViewController:子视图控制器的方法。
清单5-1展示了一个容器如何在其容器中嵌入一个子视图控制器。建立父子关系后,容器设置其子的框架,并将子视图添加到自己的视图层次结构中。设置子视图的框架大小很重要,并确保视图在容器中正确显示。在添加视图后,容器调用didMoveToParentViewController:子视图的方法,使子视图控制器有机会响应视图所有权的更改。
将一个子视图控制器添加到一个容器
1 | - (void) displayContentController:(UIViewController*) content { |
在前面的例子中,注意你只调用didMoveToParentViewController:子方法。那是因为该方法为你addChildViewController:调用孩子的willMoveToParentViewController:方法。您必须didMoveToParentViewController:自己调用方法的原因是,只有在将子视图嵌入到容器的视图层次结构中之后,方法才能被调用。
使用自动布局时,在将子对象添加到容器的视图层次结构后,在容器和子对象之间设置约束。你的约束只会影响孩子的根视图的大小和位置。请勿更改子视图层次结构中的根视图或任何其他视图的内容。
删除子视图控制器
要从内容中删除子视图控制器,请通过执行以下操作来删除视图控制器之间的父子关系:
willMoveToParentViewController:用值 调用孩子的方法nil。
删除您使用该子视图的配置的任何约束。
从容器的视图层次结构中移除孩子的根视图。
调用孩子的removeFromParentViewController方法来完成亲子关系的结束。
删除子视图控制器会永久切断父级和子级之间的关系。只有当您不再需要引用子视图控制器时,才能移除子视图控制器。例如,当新导航控制器被推入导航堆栈时,导航控制器不会移除其当前的子视图控制器。只有当它们从堆栈中弹出时才会被删除。
显示了如何从容器中删除子视图控制器。willMoveToParentViewController:使用该值调用该方法nil使子视图控制器有机会为更改做准备。该 removeFromParentViewController方法还调用孩子的didMoveToParentViewController:方法,传递该方法的值nil。设置父视图控制器以nil完成从容器中删除子视图。
从容器中删除一个子视图控制器
1 | - (void) hideContentController:(UIViewController*) content { |
子视图控制器之间的过渡
当您想要用另一个子视图控制器替换动画时,将子视图控制器的添加和删除合并到转换动画过程中。在动画之前,请确保两个子视图控制器都是您的内容的一部分,但让当前的孩子知道它即将消失。在您的动画中,将新的孩子的视图移动到位并移除旧的孩子的视图。完成动画后,完成子视图控制器的移除。
显示了如何使用过渡动画将一个子视图控制器交换为另一个子视图控制器的示例。在这个例子中,新的视图控制器被动画为现有的子视图控制器当前占用的矩形,该控制器被移出屏幕。动画完成后,完成块从容器中删除子视图控制器。在这个例子中,该transitionFromViewController:toViewController:duration:options:animations:completion:
方法自动更新容器的视图层次,所以你不需要自己添加和删除视图。
两个子视图控制器之间的转换
1 | - (void)cycleFromViewController: (UIViewController*) oldVC |